Home > wireless Audio 1TX to multi-RX for in-ceiling in-wall speaker soundbar LCR Center Surround sound home theater cinema subwoofer
Products Catalogue
Contact Us
Tel: 86-755-29812360
Fax:86-755-29812361
Add:3 Floor, Block 3,Cichang industrial Zone,Longgang District,Shenzhen 518115,Guangdong,China
E-mail: sales@lengtion.com


Tags
wireless Audio 1TX to multi-RX for in-ceiling in-wall speaker soundbar LCR Center Surround sound home theater cinema subwoofer
wireless Audio 1TX to multi-RX for in-ceiling in-wall speaker soundbar LCR Center Surround sound home theater cinema subwoofer

This is Not Bluetooth wireless Audio,If Bluetooth wireless,it is only support 2RX at max,and distance can only up to 7-15m.
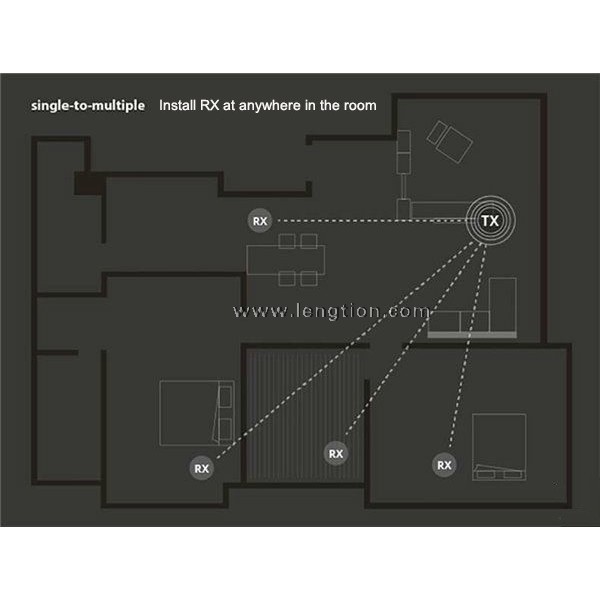
This is a new technology of wireless Audio transmission,the distance can up to 100m without any delay and interferences.And the most important thing is that this solution can support 1 transmitter to many receiver (wireless headset).And the headset is builted-in battery which can be rechargable. It can work for 4 hours.widely use in cineme,home theater,training ,teaching etc.
TX side (black box),which connected with input audio source.such as DVD,amplifier etc
Power button: Press and hold for 2 seconds to turn it on; press and hold for 2 seconds to turn it off.
Status indicator light: This Green indicator light is always on after power on.
Power input port: 5V supply voltage, powered by 5V 1A power adapter.
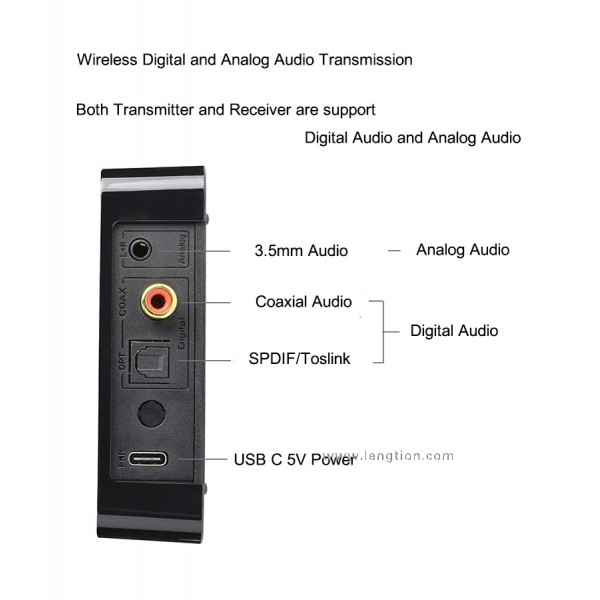
Optical input port: Digital audio optical input interface.
Coaxial input port: Digital audio coaxial input interface.
Analog audio input port: Analog audio 3.5mm input interface.
Pairing button: The transmitter and receiver are paired and completed in the factory, and the normal application does not need to be re-paired.
In some cases, if the transmitter and receiver need to be re-paired,, just press the pairing button for 3 seconds at the same time after booting up. You will see both the transmitter status indicator light and the receiver status indicator light flashing. When the pairing is successful, the receiver status indicator light will change from blinking to steady state.
Tips: The transmitter is only 15 seconds in the pairing mode. whether the pairing is successful or not, the transmitter will automatically exit the pairing mode after 15 seconds, and the transmitting indicator light will change from blinking to steady state. Be sure to press the receiver's pairing button within 15 seconds.
If one transmitter is required to be used in combination with multiple receivers, each receiver must be re-paired separately with the transmitter.
Digital/Analog input switch: When the switch is set to the “Digital “side, the audio channel is switched to the digital input interface. At this time, please connect to the audio source device through optical fiber cable or coaxial cable. Note that the optical fiber and coaxial cable cannot be used at the same time; when the switch is set to the “Analog” side, the audio channel is switched to the analog input interface. At this time, please connect to the audio source device through a 3.5mm audio cable.
Power button: Press and hold for 2 seconds to turn it on; press and hold for 2 seconds to turn it off.
Status indicator light: If the receiver receives a signal after startup, the Green indicator light is always on. If no signal is received, the Green indicator light flashes slowly.
For models with built-in lithium battery, this indicator is a two-color indicator light of red and green. It lights up in red when charging, and turns off when fully charged.
Power input port: 5V supply voltage, powered by 5V 1A power adapter.
Optical output port: Digital audio optical output interface.
Coaxial output port: Digital audio coaxial output interface.
Analog audio output port: Analog audio 3.5mm output interface.
Pairing button: The transmitter and receiver are paired and completed in the factory, and the normal application does not need to be re-paired.
If you need to re-pair, follow the above process for pairing.
Digital/Analog output switch: When the switch is set to the “Digital “side, the audio channel is switched to the digital output interface, please connect to the terminal device through an optical fiber or coaxial cable; when the switch is set to the “Analog” side, the audio channel is switched to the analog output interface, Please connect to the terminal device through a 3.5mm audio cable.
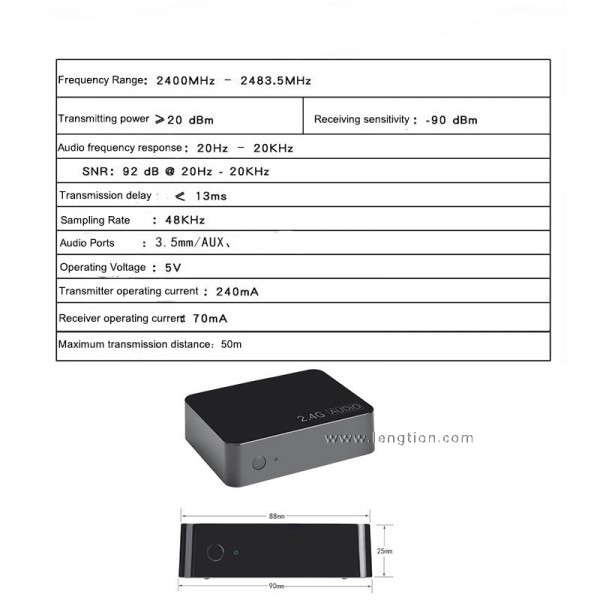
External antenna interface:3dbi 2.4GHz antenna is used by default
If longer transmission distance is needed, you can use a High-Gain Antenna.
The transmitter needs to be placed in an area that is not blocked by metal to ensure good quality of the transmitted signal.
When using the receiver, try to avoid placing it closer to other wireless transmitters to avoid the interruption of the sound caused by the interference of the received signal.
The digital modulation of this product is wireless bidirectional transmission, and the receiver will also transmit signals when receiving signals.
For very few models of audio amplifiers, this transmitted signal may interfere with the audio and cause the audio noise floor to rise, if the audio is found to be disturbed, move the receiver to avoid interference effects.
This product is made up of precision parts. Do not throw them casually to avoid serious damage.
This product is not waterproof. Do not let water directly into the inside of the device.
Functions, accessories, and packaging may be adjusted without notifying the user, please refer to the actual delivery
This is Not Bluetooth wireless Audio,If Bluetooth wireless,it is only support 2RX at max,and distance can only up to 7-15m.
This is a new technology of wireless Audio transmission,the distance can up to 100m without any delay and interferences.And the most important thing is that this solution can support 1 transmitter to many receiver (wireless headset).And the headset is builted-in battery which can be rechargable. It can work for 4 hours.widely use in cineme,home theater,training ,teaching etc.
TX side (black box),which connected with input audio source.such as DVD,amplifier etc
Power button: Press and hold for 2 seconds to turn it on; press and hold for 2 seconds to turn it off.
Status indicator light: This Green indicator light is always on after power on.
Power input port: 5V supply voltage, powered by 5V 1A power adapter.
Optical input port: Digital audio optical input interface.
Coaxial input port: Digital audio coaxial input interface.
Analog audio input port: Analog audio 3.5mm input interface.
Pairing button: The transmitter and receiver are paired and completed in the factory, and the normal application does not need to be re-paired.
In some cases, if the transmitter and receiver need to be re-paired,, just press the pairing button for 3 seconds at the same time after booting up. You will see both the transmitter status indicator light and the receiver status indicator light flashing. When the pairing is successful, the receiver status indicator light will change from blinking to steady state.
Tips: The transmitter is only 15 seconds in the pairing mode. whether the pairing is successful or not, the transmitter will automatically exit the pairing mode after 15 seconds, and the transmitting indicator light will change from blinking to steady state. Be sure to press the receiver's pairing button within 15 seconds.
If one transmitter is required to be used in combination with multiple receivers, each receiver must be re-paired separately with the transmitter.
Digital/Analog input switch: When the switch is set to the “Digital “side, the audio channel is switched to the digital input interface. At this time, please connect to the audio source device through optical fiber cable or coaxial cable. Note that the optical fiber and coaxial cable cannot be used at the same time; when the switch is set to the “Analog” side, the audio channel is switched to the analog input interface. At this time, please connect to the audio source device through a 3.5mm audio cable.
Power button: Press and hold for 2 seconds to turn it on; press and hold for 2 seconds to turn it off.
Status indicator light: If the receiver receives a signal after startup, the Green indicator light is always on. If no signal is received, the Green indicator light flashes slowly.
For models with built-in lithium battery, this indicator is a two-color indicator light of red and green. It lights up in red when charging, and turns off when fully charged.
Power input port: 5V supply voltage, powered by 5V 1A power adapter.
Optical output port: Digital audio optical output interface.
Coaxial output port: Digital audio coaxial output interface.
Analog audio output port: Analog audio 3.5mm output interface.
Pairing button: The transmitter and receiver are paired and completed in the factory, and the normal application does not need to be re-paired.
If you need to re-pair, follow the above process for pairing.
Digital/Analog output switch: When the switch is set to the “Digital “side, the audio channel is switched to the digital output interface, please connect to the terminal device through an optical fiber or coaxial cable; when the switch is set to the “Analog” side, the audio channel is switched to the analog output interface, Please connect to the terminal device through a 3.5mm audio cable.
External antenna interface:3dbi 2.4GHz antenna is used by default
If longer transmission distance is needed, you can use a High-Gain Antenna.
The transmitter needs to be placed in an area that is not blocked by metal to ensure good quality of the transmitted signal.
When using the receiver, try to avoid placing it closer to other wireless transmitters to avoid the interruption of the sound caused by the interference of the received signal.
The digital modulation of this product is wireless bidirectional transmission, and the receiver will also transmit signals when receiving signals.
For very few models of audio amplifiers, this transmitted signal may interfere with the audio and cause the audio noise floor to rise, if the audio is found to be disturbed, move the receiver to avoid interference effects.
This product is made up of precision parts. Do not throw them casually to avoid serious damage.
This product is not waterproof. Do not let water directly into the inside of the device.
Functions, accessories, and packaging may be adjusted without notifying the user, please refer to the actual delivery